pretty blue typewriter

This weekend Charles and I took a little trip out to the Poconos. On our way back home, I convinced him that we had to go antiquing. I’m glad that we stopped because we came across this beauty:

typewriter

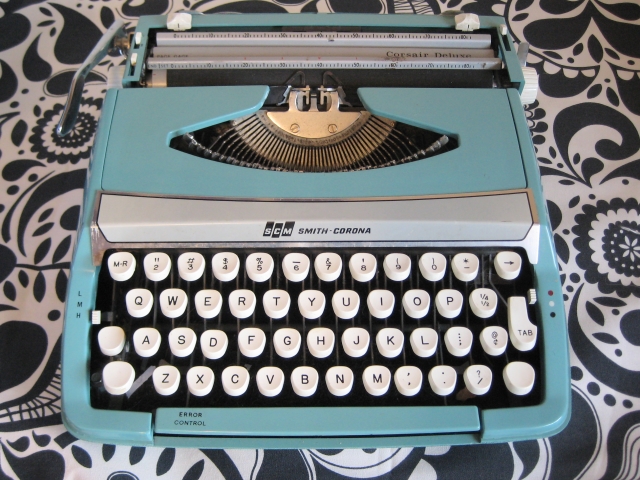
I knew that I would kick myself if I passed it up, so it came home with me. I had a typewriter when I was younger (maybe 8?) and used to love typing on it. There is something about the solid kerthunk noise that each key makes that is so satisfying. Plus, you don’t really have the option to edit what you write, so it is an exercise in committing and learning to live with your mistakes. I don’t know how often I’ll actually type on it, but it sure is nice to look at.

sideview


LLPC

llpc

My lovely sister, Lizi or Lizi Lizi Patty Cakes, is visiting for the next couple of days, so I’ll be back on Monday! I hope that everyone has a wonderful weekend!

roasted acorn squash with walnuts

squash

I know that a lot of people look forward to the return of fall because it means OMG PUMPKIN EVERYTHING!!!!, but I look forward to the return of squash – specifically acorn squash. I love acorn squash. I make it into soup, I make it into rolls. I microwave it so it steams, and eat it with just a bit of butter. I also love to roast it. I was thinking about new ways to prepare it when I thought about paring it with maple syrup and walnuts. The maple syrup caramelizes beautifully, and the walnuts toast up slightly and add a wonderful crunch. This is one of my favorite weekend lunches because it makes two – one for you and one for a friend. If you wanted to serve this as a side dish, you could cut them into large chunks once they are cooked.

squashcloseup

Roasted Acorn Squash with Walnuts

makes 2

Ingredients:

  • 1 acorn squash, cut in half stem to tip, seeds scooped out
  • 2 tbsp olive oil
  • 3 tbsp maple syrup
  • 1/3 cup walnuts, chopped
  • cayenne pepper (optional)
  • salt & pepper

Directions:

  1. Preheat oven to 400 degrees.
  2. On a rimmed baking sheet, covered with foil and lightly oiled, place the two halves skin side down. Lightly brush the flesh with the olive oil. Place in oven and cook for 20 minutes.
  3. Remove from oven and brush the flesh with the maple syrup. Pour any remaining maple syrup in the hollowed out center. Sprinkle with salt and pepper and just a pinch of cayenne pepper if you would like a little heat. Divide the walnuts between the two halves. Stir gently to mix with the maple syrup.
  4. Return to the oven and bake for about 25 minutes. They will be done when they look caramelized and a fork pierces through the flesh easily.
  5. Let cool for about 5 minutes, then transfer to a bowl. The bowl allows you to scoop out the squash while eating it without burning your fingers.

how to: freeze peaches

peaches

Shortly after we moved to New Jersey we were out for a drive and passed a farm that had pick your own peaches. We decided to stop and ended up with way more peaches than either of us could have eaten before they went bad. Because I didn’t have any tools to can them, I decided to freeze them. I researched a bit, and ended up deciding to pack them in a light sugar syrup. If I don’t need them in syrup, a quick rinse under some water and they are good to go.

Ingredients:

  • peaches // You want them to be ripe, but not overly so. If you are worried that they are too ripe, give them a sniff and if they don’t smell bad/fermented  you should be fine. You can always cut off any brown spots. As for the amount, it is up to you. It takes about 5 good sized peaches to make 1 quart of peaches. 
  • 2-4 cups of sugar // If you want them in a heavier syrup use more sugar, but I usually do 2 cups. You can also substitute 2 cups of stevia or cooking splenda, or  4 cups of fruit juice. If you are using fruit juice you won’t need to make a sugar solution, and can skip step 2. 
  • 1/4 cup fresh lemon juice
  • water
  • ice

Tools:

  • large spoon/ladle
  • large pot
  • medium pot
  • freezer bags
  • 2 large bowls
  • sharp knife
  • cutting board // Peaches are very juicy, so I usually place a couple of paper towels under cutting board to soak up any errant juice. 
  • jar funnel (optional) // This just keeps your bags a little neater, but it really isn’t necessary if you rolls your bags about  2 inches down when filling them. When you turn it back up, the zipper should be clean

frozenpeaches

Directions:

  1. Bring a large pot of water to boil. Meanwhile, wash all of your peaches. Discard any that smell rotten.
  2. Meanwhile, make your sugar syrup. Combine your sugar and 6 cups of water in the medium pot. Set over medium-high heat and stir until the dissolves. Let cool while you process the peaches.
  3. Set up an ice bath in one of your bowls using cold water and ice. Once your large pot of water comes to a boil, you will start removing the skin in batches. I usually work with about 5 peaches at a time. Using your sharp knife, score a 2 inch x in the bottom of each peach. You want to pierce the skin, but not go too far into the flesh. Drop the peaches into the boiling water. After 30 seconds remove from the boiling water. Remove the peaches and place into the ice bath.
  4. Let the peaches sit for about a minute. The skins should easily slip off. If they seem to be having a lot of trouble, place them back in the boiling water for 15 seconds, then the ice water and try again. Slice up your peaches (I usually slice them into ~1/2 inch slices). If there are any brown spots, cut them off at this time. Place into your other bowl.
  5. Repeat steps 3 and 4 until you’ve sliced up all of your peaches. Sprinkle lemon juice over your peaches and stir gently to combine.  Pour your syrup/juice over the peaches. It should be about a 1 cup of syrup to 1 quart of fruit ratio. If you are slightly short, just add a bit of water, or if you are drastically short, you can whip up some more syrup.  If you have too much, just discard what your don’t place into the bags.
  6. Label your freezer bags with the amount/date/any other info you want to. Ladle your peaches into the bag. In a quart sized freezer bag, I usually do 2 cups of peaches and about 1/2 cup of syrup. Squeeze out as much air as you can and seal the bags. Repeat for the remaining amount of peaches.
  7. Place your bags in the freezer. I like to freeze mine flat, so I first stack them on a plastic cutting board. Once they are frozen, I have a plastic tub that I can place them in upright to take up less space. They will last about a year.
  8. To use: Let them thaw in the refrigerator or on the counter. You can rinse them off and use however you would like to. My sister swears by letting them get partially unfrozen and eating them right out of the bag with a spoon.